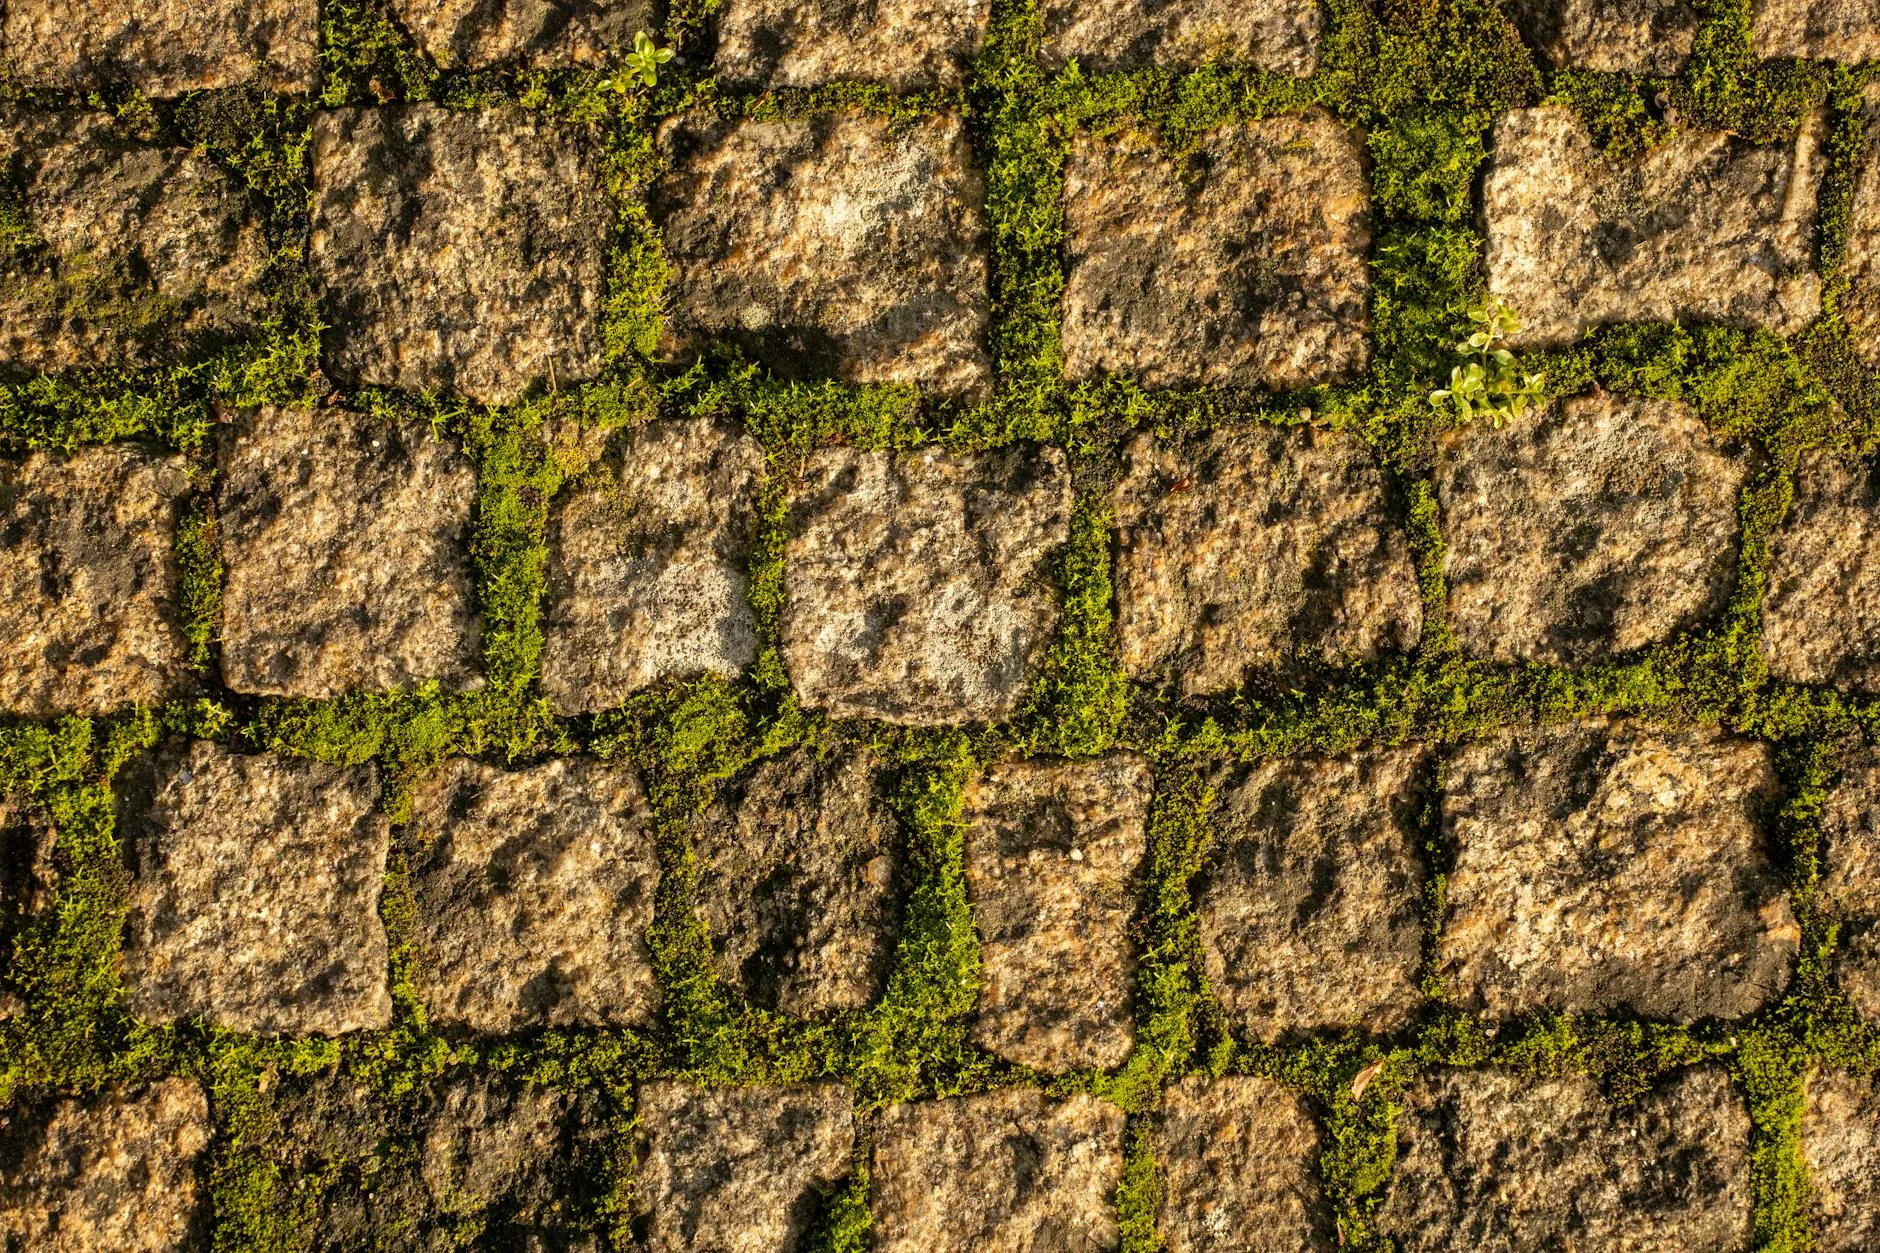
Every spring it is the same story. You pull back the curtains, look at the patio, and wonder how something that looked fine in September now resembles the floor of a damp forest. Green moss creeps between the slabs, black algae stains the surface, and the whole thing is slippery enough to send you flying when you step outside with a cup of tea. The good news is that most patio moss and algae cleans up with basic tools you probably already have — and once you know how to stop it coming back, you will not be doing this every year.
In This Article
- Why Moss and Algae Grow on Patios
- What You Need Before You Start
- How to Remove Moss from Patio Slabs
- How to Remove Algae and Green Film
- Pressure Washing Your Patio Safely
- Cleaning Different Patio Materials
- Homemade vs Commercial Patio Cleaners
- How to Stop Moss and Algae Coming Back
- Cleaning Between Patio Slabs
- When to Call a Professional
- Frequently Asked Questions
Why Moss and Algae Grow on Patios
Understanding what causes the green invasion helps you prevent it, not just clean it up every spring.
Shade and Moisture
Moss and algae thrive in damp, shaded conditions. If part of your patio sits under a tree canopy, next to a north-facing wall, or in an area that stays wet after rain, that is where the growth will concentrate. I have a patio where the left side gets full sun and the right side is shaded by a fence — the difference after winter is extraordinary. The sunny side stays relatively clean while the shaded half turns into a green carpet.
Poor Drainage
Water that pools on the surface or fails to drain between slabs creates the perfect habitat. Patios should have a slight fall (about 1 in 60) away from the house to prevent standing water. If yours does not — common on older patios or DIY jobs — water sits in low spots and moss colonises quickly.
Porous Materials
Natural stone, concrete, and sandstone have a rougher, more porous surface than porcelain or resin. Those tiny pores hold moisture and organic matter, giving moss and algae a foothold. Smoother, non-porous materials like porcelain pavers resist growth much better — something worth knowing if you are ever relaying a patio.
Autumn Debris
Fallen leaves, blossom, and organic matter that sit on slabs through autumn and winter decompose slowly, creating a nutrient-rich layer that moss feeds on. Sweeping regularly in autumn is one of the simplest preventive measures — ten minutes with a stiff broom every week or two makes a noticeable difference come spring.
What You Need Before You Start
Essential Tools
- Stiff-bristled broom or yard brush — the single most useful patio cleaning tool
- Garden hose with spray nozzle — for rinsing
- Bucket — for mixing cleaning solutions
- Protective gloves — rubber or nitrile, especially for chemical cleaners
- Old clothes — patio cleaning is a splashy, dirty job
Optional but Helpful
- Pressure washer — speeds up the job enormously but not essential for small patios
- Patio scraper or weeding knife — for thick moss between joints
- Watering can with rose attachment — for applying cleaning solution evenly
- Safety goggles — recommended when pressure washing or using strong chemicals
Chemicals to Have Ready
- White vinegar — mild acid that kills algae on contact (cheap, safe for most surfaces)
- Bicarbonate of soda — gentle abrasive for light cleaning
- Dedicated patio cleaner — Jeyes Fluid (about £5-8 from B&Q or Screwfix), Wet and Forget (about £18-25 from Amazon UK), or Patio Magic (about £12-15 from most garden centres)
- Bleach (diluted) — effective but use with caution near plants and lawns
How to Remove Moss from Patio Slabs
Moss is the chunky green growth that lifts off in clumps. It is easier to remove than algae because it has visible structure you can physically scrape.
Step 1: Scrape Off the Bulk
Use a patio scraper, stiff brush, or even a flat-head shovel held at a low angle to lift moss clumps off the slab surface. Work in one direction, pushing moss towards the edge of the patio. Do this when the patio is dry — wet moss smears rather than lifts. The first time I cleaned a neglected patio, the initial scrape alone removed about 70% of the visible moss in under an hour.
Step 2: Brush and Sweep
After scraping, sweep the loose moss into a pile with a stiff yard brush. Bag it for green waste collection rather than composting — moss in compost heaps can regrow if conditions are right.
Step 3: Apply a Moss Killer
Mix a patio cleaning solution (see the section on homemade vs commercial cleaners below) and apply it across the affected areas with a watering can or garden sprayer. Leave it for the time specified on the product — usually 24-48 hours for dedicated patio cleaners, or 30-60 minutes for diluted vinegar.
Step 4: Scrub and Rinse
After the treatment period, scrub the surface with a stiff brush to dislodge any remaining moss. Rinse thoroughly with a garden hose. For stubborn patches, repeat the treatment or use a pressure washer on a low setting.
How to Remove Algae and Green Film
Algae is trickier than moss because it forms a thin, slippery film rather than clumps you can scrape. It bonds to the slab surface and needs chemical treatment or pressure to remove.
The Bleach Method
Mix household bleach at a 1:5 ratio with water (one part bleach to five parts water). Apply to the affected area with a watering can or pump sprayer. Leave for 15-30 minutes, then scrub with a stiff brush and rinse thoroughly. Bleach kills algae on contact and works fast, but it will also kill any plants it touches. Keep it away from lawns, borders, and planted areas. Rinse surrounding soil with clean water after use.
The Vinegar Method
White vinegar (at least 5% acidity, the standard supermarket kind) kills algae without the harshness of bleach. Apply undiluted to algae-covered areas, leave for 30 minutes, scrub with a brush, and rinse. It is safer near plants than bleach, though heavy application can still affect soil pH. For a small patio or areas close to borders, vinegar is the better choice.
The Commercial Cleaner Method
Products like Patio Magic and Wet and Forget are designed specifically for algae removal. They work more slowly than bleach (Wet and Forget can take several weeks to show full results) but require less scrubbing. Apply, leave, and let rain do the rinsing. These are ideal if you do not want a full hands-and-knees cleaning session. Patio Magic (about £12-15 from B&Q) is the one I keep coming back to — you apply it, walk away, and the patio gradually cleans itself over the following weeks.
Pressure Washing Your Patio Safely
A pressure washer makes light work of moss and algae, but it can also damage your patio if used incorrectly. This is the most common mistake people make when cleaning their outdoor surfaces.
Choosing the Right Pressure
For patio cleaning, you need between 100-130 bar of pressure. Consumer models from Karcher, Nilfisk, or Bosch in the £100-250 range handle this comfortably. Above 150 bar, you risk etching concrete and dislodging jointing sand from between slabs. If you have already invested in a pressure washer, check our best pressure washers guide for performance comparisons across different surfaces.
Keep a Consistent Distance
Hold the lance 30-40cm from the surface. Closer than 30cm concentrates the jet and can pit softer stones. Further than 50cm loses effectiveness. Keep the distance consistent — do not jab at stubborn patches, which creates uneven marks.
Use a Surface Cleaner Attachment
A patio surface cleaner (the flat disc attachment with spinning nozzles underneath) distributes pressure evenly across a wider area. It prevents the striping effect you get from a standard lance and speeds up the job considerably. Most Karcher and Nilfisk models have compatible surface cleaners for about £30-60. Worth every penny if you have more than a few square metres to clean.
Work Methodically
Start at one end of the patio and work in overlapping strips, moving away from the house. This pushes dirty water away from clean areas and prevents recontamination. Clean one strip fully before moving to the next — going back and forth creates uneven results.
What NOT to Do
- Never aim at pointing or mortar joints — the pressure will blast jointing sand straight out, leaving gaps that let weeds and moss regrow faster
- Never use a turbo nozzle on natural stone — the rotating jet is too aggressive and will leave circular marks
- Never pressure wash resin-bound surfaces — the force can lift stones from the resin binder. Use a garden hose and soft brush instead
Cleaning Different Patio Materials
Different paving materials need different approaches. What works on concrete can ruin sandstone.
Concrete Slabs
The most forgiving material to clean. Concrete handles pressure washing, bleach, vinegar, and commercial cleaners without damage. Use up to 130 bar pressure and any cleaning solution. The only risk is using too much pressure too close, which can etch the surface and expose aggregate underneath.
Natural Sandstone
Sandstone is porous and relatively soft. Avoid bleach (it can cause discolouration), and keep pressure washer settings below 110 bar. Use a stone-specific cleaner like LTP Mouldex (about £15 from Amazon UK) rather than generic patio cleaners. Always test any chemical on an inconspicuous area first — sandstone colours vary, and some react unpredictably.
Porcelain Pavers
Porcelain is non-porous and resistant to moss and algae growth, so it rarely needs intensive cleaning. A stiff brush and soapy water usually does the job. Pressure washing is fine (porcelain is tough), but avoid acidic cleaners which can damage the surface glaze. Most porcelain manufacturers, including Marshalls, recommend nothing more than warm soapy water for routine cleaning. Save the heavy-duty treatments for the once-a-year deep clean.
Indian Stone
Indian stone (including Kota, Kandla Grey, and Raj Green) is popular in UK patios but needs careful treatment. Never use acid-based cleaners — they cause rust staining on iron-rich stones. Use an alkaline cleaner specifically designed for Indian stone, and keep pressure below 110 bar. Sealing after cleaning helps prevent future growth.
Block Paving
Block paving has lots of joints where moss loves to grow. Remove moss from joints with a patio scraper or weeding tool before cleaning the surface. After cleaning, re-sand the joints with kiln-dried sand to prevent regrowth. Polymeric sand (about £20-30 for 15kg from B&Q) sets harder and resists moss better than standard kiln-dried sand.
Homemade vs Commercial Patio Cleaners
White Vinegar Solution
Mix equal parts white vinegar and water in a watering can. Cost: about £1 per application. Effective against light algae and green film. Safe near most plants when diluted, though repeated use can acidify soil. Best for: small patios, areas near borders, regular maintenance cleaning.
Bicarbonate of Soda Paste
Mix bicarbonate of soda with water to form a thick paste. Apply to stubborn spots, leave for 30 minutes, scrub with a brush. Cost: about 50p per application. Mildly abrasive, so it lifts ingrained dirt without chemicals. Best for: spot cleaning, delicate surfaces, light staining.
Soda Crystals
Dissolve one cup of soda crystals (about £1.50 from any supermarket) in a bucket of hot water. Apply with a mop or watering can, leave for 20 minutes, scrub and rinse. Effective against organic stains and light algae. Best for: routine cleaning, eco-friendly approach.
Commercial Options Worth Buying
- Patio Magic Concentrate (about £12-15) — spray and leave, works over 2-4 weeks, no scrubbing needed. My go-to for large areas because it does the work while I do something else
- Wet and Forget (about £18-25) — similar spray-and-leave approach, works over weeks with rain activation
- Jeyes Fluid (about £5-8) — strong disinfectant that kills moss and algae quickly. Dilute 1:10 with water. Effective but kills everything it touches, so protect plants
- LTP Mouldex (about £15) — specifically formulated for natural stone. Safer than generic cleaners on sandstone and limestone
How to Stop Moss and Algae Coming Back
Cleaning is half the battle. Prevention stops you repeating the whole process next spring.
Improve Drainage
If water pools on your patio, address the drainage. Clearing blocked drain channels, re-pointing joints that have crumbled, or even adjusting the fall by relaying problem sections can massively reduce moisture retention. Standing water is the single biggest contributor to moss growth.
Trim Overhanging Vegetation
Trees and shrubs that shade the patio keep it damp and drop organic matter that feeds moss. Trim branches to allow more sunlight and airflow across the surface. Even partial sun exposure reduces moss growth noticeably — you can often see the exact shadow line where moss stops and clean patio begins.
Sweep Regularly in Autumn
Dead leaves and organic debris are moss nutrients. Sweeping them off the patio every week or two during autumn prevents the nutrient layer from building up. Ten minutes with a broom is far less effort than a full spring clean. For more tips on protecting your outdoor space through the seasons, see our spring garden preparation guide.
Apply a Preventive Treatment
After cleaning, apply a moss and algae inhibitor. Wet and Forget works as both a cleaner and a preventive — apply in spring after cleaning and it keeps growth suppressed through the year. Alternatively, seal your patio with a breathable sealant (Resiblock or Smartseal, about £30-50 per 5 litres from Amazon UK or Screwfix). Sealant blocks moisture from penetrating the stone surface, starving moss of the damp environment it needs.
Re-Sand Joints Properly
Open or crumbled joints between slabs are where moss gets its strongest foothold. After cleaning, brush kiln-dried sand or polymeric sand into all joints. Polymeric sand hardens when wet and creates a much more resistant barrier than standard sand. Our guide on how to stop weeds growing between patio slabs covers jointing options in detail.
Cleaning Between Patio Slabs
The gaps between slabs accumulate more moss and debris than the slab surfaces themselves. They need specific attention.
Manual Scraping
A patio weeding knife or old flat-head screwdriver works well for dragging moss and weeds out of joints. Run the blade along each joint, pulling debris towards you. Tedious on a large patio, but thorough. Do this before pressure washing — loose material in joints clogs drainage and makes the overall clean harder.
Pressure Washer Technique
Use a narrow fan nozzle (15-25 degrees) along the joint lines only. Keep the lance at a 30-degree angle to the surface so the jet pushes debris out of the joint rather than blasting it deeper. Work one joint at a time and sweep up debris as you go.
Re-Pointing After Cleaning
If cleaning exposes crumbled mortar or empty joints, re-point them before they refill with moss. Use a mortar mix (4:1 sand to cement) for mortared patios, or brush in kiln-dried sand for loose-laid slabs. Re-pointing is boring but it is the single most effective thing you can do to prevent regrowth in joints.
When to Call a Professional
Large or Heavily Neglected Patios
A patio that has not been cleaned in five years or more often has deeply embedded moss and algae that resist DIY cleaning. Professional patio cleaners have industrial-grade equipment and experience with different stone types. Expect to pay about £3-6 per square metre for professional cleaning, so a 20-square-metre patio costs roughly £60-120.
Delicate or Expensive Stone
If you have a natural stone patio that cost thousands to lay, a professional clean is a sensible investment. They know which chemicals and pressures work with specific stones and can avoid the discolouration and damage that DIY attempts sometimes cause. A £100 professional clean is cheaper than replacing stained slabs.
Resealing Services
Professional cleaners often offer cleaning and resealing as a package. The seal protects the stone for 3-5 years, reducing the need for annual deep cleans. For high-end patios, this is usually worth the premium — a typical clean-and-seal package runs about £8-12 per square metre.
Frequently Asked Questions
Will bleach damage my patio slabs? Diluted household bleach (1:5 with water) is safe for concrete and porcelain slabs. Avoid using bleach on natural sandstone, limestone, or Indian stone — it can cause permanent discolouration. Always rinse thoroughly after use and protect nearby plants and lawns from runoff.
How often should I clean my patio? A proper deep clean once a year in spring is enough for most patios. Supplement this with regular sweeping in autumn and a quick hose-down every few weeks during summer. If you apply a preventive treatment like Wet and Forget after cleaning, you may only need a deep clean every two years.
Can I use a pressure washer on all types of patio? Most patio materials can handle pressure washing at the right settings — 100-130 bar for concrete, below 110 bar for sandstone and Indian stone. The exception is resin-bound surfaces, which should never be pressure washed. Always start with a lower pressure and test an inconspicuous area first.
Is moss on a patio dangerous? Wet moss and algae are extremely slippery and a real slip hazard, especially for children and older adults. Falls are a leading cause of injury in the UK, and slippery outdoor surfaces are a common contributor. Beyond the slip risk, moss roots can gradually widen cracks and joints in paving, causing structural damage over time. Cleaning it is not just cosmetic — it is a safety and maintenance issue.
What is the fastest way to remove moss from a patio? A pressure washer with a surface cleaner attachment is the fastest method — a standard patio takes 1-2 hours. Without a pressure washer, scraping off the bulk, applying a bleach solution (on suitable surfaces), and scrubbing with a stiff brush takes a full day for a medium-sized patio. Chemical spray-and-leave products like Patio Magic require the least effort but take 2-4 weeks to show full results.